hard drive not showing up some Windows 10 users have had trouble with a program called Windows Modules Installer Worker using a lot of CPU power. It usually uses more than 50% of your CPU, and in the worst cases, it can even use 100%. This makes the computer slow and puts it at risk of things like overheating or breaking hardware.
Don’t worry, the Windows Modules Installer Worker is not a virus or other bad software. It’s perfectly safe to run on your computer, but it has problems. This article shows you how to fix the “high CPU usage” error and get your computer back to normal.
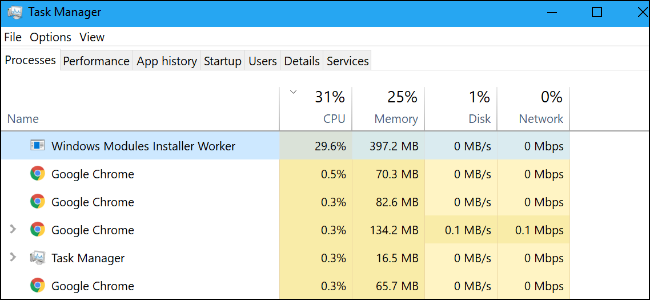
Check the Task Manager if you hear your computer’s fans spinning and feel it getting hotter for no apparent reason. “Windows Modules Installer Worker” could be the cause of the CPU problem your PC is having. The Windows operating system includes this process, which is also called TiWorker.exe.
Here is the important information about Windows Modules Installer Worker that you need to know.
What is Windows Modules Installer Worker?

The Windows Module Installer Worker is an important PC tool that helps the computer automatically check for Windows updates. It is a must-have tool if you want Windows to automatically check for updates on your PC or laptop since it runs while Windows Updates are being looked for and installed.
Windows Modules Installer Worker, also called TiWorker.exe, is basically a Windows Update Service. It checks for Windows system updates that have just become available and install them on your computer. This process runs whenever your system checks for updates on its own or when you start a search for updates yourself.
When users notice a sudden slowdown and open the Task Manager to see what’s going on, they may find that the Windows Modules Installer Worker is using up to 100% of the CPU. This is why some users think that the Windows Update Installer worker causes CPU problems when it’s looking for updates.
Read More: What is APAP Login? How Does It Affect Sleep Apnea?
Why Does Windows Modules Installer Worker Load my system CPU?
The Windows Modules Installer Worker is always looking for updates, so it is often the reason why the CPU is used so much. In Windows, the OS is the most important thing. Updates and upgrades are usually set to happen at night when the PC is not being used. But sometimes, when the system is turned off at night, the only way to fix it is for the updates to download and install themselves during the day or when your computer is on.
In rare cases, the Windows modules installer worker uses a lot of CPU when the RAM is full or when PC drivers are out of date. This can happen when you search for or install Windows 10 updates manually or automatically. Most of the time, it also happens when a laptop or PC is being fixed.
How long does the modules installer worker process have a lot of work to do? is another common question. There is no right answer to this question. You might see it until the process is done or until Windows starts up again.
But if the TiWorker.exe process causes a load of 80–100% for an hour, two, or more, you should first try to restart your PC or laptop. Let the system start up normally, wait about 5 minutes, and then watch how the installer process works. Most of the time, when you restart your computer, the Windows modules installer worker process does a lot less.
Can I Disable the Windows Modules Installer Worker?
In your search for a way to stop the Windows Modules installer worker from using so much CPU, you may come across advice that says you should turn it off. Yes, the Windows Modules Installer worker system service can be turned off. But if you do this, Windows won’t be able to update correctly, so you shouldn’t do it.
It Is Important to Always Keep Your Windows OS Up to Date.
So, it’s best to just accept that the TiWorker.exe process will sometimes use a lot of CPU or disk space and let it do its thing. This is how Windows updates are installed, and it’s for your own good.
Fix Windows Modules Installer Worker high CPU usage
Use the following steps to fix Windows Modules Installer Worker – High CPU Usage:
Method 1. Remove the SoftwareDistribution folder
When trying to fix this problem, the first thing you should try is to delete a folder called SoftwareDistribution. By default, new updates are put in this folder. When a corrupt file is stored here, the Windows Modules Installer Worker can have a number of problems.
If you delete the folder, it won’t hurt anything because Windows 10 will make a new folder with the same name when a new update is found. Please keep in mind that you may need to be logged in as an administrator to use this method.
- Temporarily disable the Windows Update service using these steps:
- Press the Windows + R keys on your keyboard to open the Run utility.
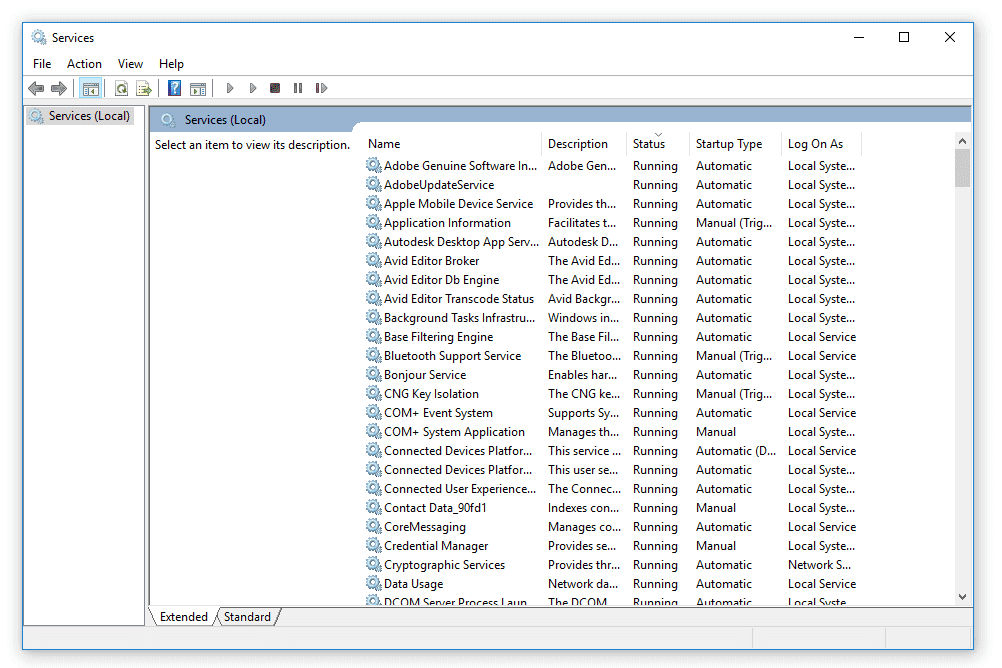
- Type in “services.msc” without the quotation marks, and click the OK button. The Services window will open up.
- Locate the Windows Update service. Right-click on it, then select Pause/Stop.
- Using the File Explorer, navigate to C:\Windows.

- Select the SoftwareDistribution folder right-click on it. Hit the Delete option from the context menu.

- Restart your device and test if your Windows Modules Installer Worker issue is fixed.
Read More: What is NORSTRAT and How Does It Works?
Method 2. Restart the Windows Update Service

Your Windows Modules Installer Worker might be using up a lot of resources if the update service isn’t working properly. Just follow the steps below to check and fix this.
- Press the Windows + R keys on your keyboard. This is going to bring up the Run utility.
- Type in “services.msc” and click the OK button to launch Services. This might take a moment to fully load.
- Scroll down until you find the Windows Update service. Right-click on it and select the “Stop” option.
- Wait for 30 seconds.
- Right-click on the Windows Update service again and select “Start.” This should fully restart the service.
Method 3. Use the Windows Update Troubleshooter
Microsoft has made a tool that can be used to fix problems with Windows updates. Anyone can download this tool for free, even if they don’t have a Microsoft Account. All you have to do is run the tool and see if it can find and fix any mistakes.
- Press the Windows + R keys on your keyboard. This is going to bring up the Run utility.
- Type in “services.msc” and click the OK button to launch Services. This might take a moment to fully load.
- Scroll down until you find the Windows Update service. Right-click on it and select the “Stop” option.
- Wait for 30 seconds.
- Right-click on the Windows Update service again and select “Start.” This should fully restart the service.
Method 4. Run the System File Checker (SFC scan)

The System File Checker is one of the tools that come with Windows 10. It’s also called a “SFC scan,” and it’s the fastest way to fix corrupted system files and other problems automatically.
Some users have said that running this scan stopped the Windows Modules Installer Worker High CPU problem from happening again.
- Press the Windows + R keys on your keyboard. This is going to bring up the Run utility.
- Type in “cmd” and press the Ctrl + Shift + Enter keys on your keyboard. Doing so, you’re launching the Command Prompt with administrative permissions.
- If prompted, click Yes to allow the Command Prompt to make changes on your device.
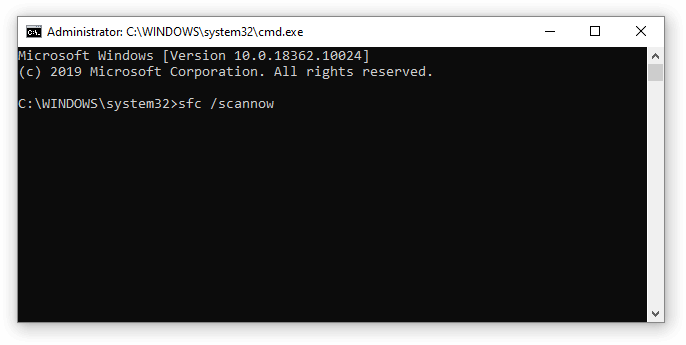
- Once in the Command Prompt, type in the following command and press Enter to execute it: sfc /scannow
- Wait for the SFC scan to finish scanning your computer and repairing corrupt files. This may take a long time; ensure that you don’t close the Command Prompt or shut your computer down.
- Restart your device after the scan is complete.
Read More: Is Wordtune the Best AI writing Assistant?
Method 5. Use the DISM command
By running commands in the Command Prompt app, you can use the DISM tool to find and fix corrupted parts of your system. It checks the whole system for corruption and automatically tries to fix broken or missing files.
- Press the Windows + R keys on your keyboard. This is going to bring up the Run utility.
- Type in “cmd” and press the Ctrl + Shift + Enter keys on your keyboard. Doing so, you’re launching the Command Prompt with administrative permissions.
- If prompted, click Yes to allow the Command Prompt to make changes on your device.
- Once in the Command Prompt, you need to start the DISM scan which will run and look for issues system-wide. Type in the following command and press Enter to execute it: DISM.exe /Online /Cleanup-image /Scanhealth.
- Next, you need to execute a command to fix any issues found on your system. Simply type in the following line and press Enter again: DISM.exe /Online /Cleanup-image /Restorehealth
- Wait for the process to finish. Upon completion, close the Command Prompt window and restart your device.
Method 6. Turn off Automatic Updates for Windows 10
Since the Windows Modules Installer Worker is part of Windows Update, you could try to fix the high CPU usage by turning off automatic updates. Follow the steps below to get this done.
- Press the Windows + I keys on your keyboard to open the Settings application. You can also open Settings from the Start menu by clicking on the gear icon.
- Click on Update & Security.
- Select Windows Update from the menu in the left panel.
- Click on Advanced Options.
- Select how long you want to pause updates by using the drop-down menu.
You can turn off updates for 35 days at a time. Follow these steps every month to make sure you don’t get updates automatically. Read our article on How to Disable Windows 10 Updates if you want to turn off Windows 10 updates for good.
Method 7. Change your Internet settings
Case 1. You have a Wi-Fi connection
- Press the Windows + I keys on your keyboard to open the Settings application. You can also open Settings from the Start menu by clicking on the gear icon.
- Click on Network and Internet.
- Open the Wi-Fi tab using the menu in the left-side panel.
- Select your current Wi-Fi network.
- Scroll down to the Metered connection section and turn on the Set as metered connection option for the Wi-Fi network.
Case 2. You Have an Ethernet Connection
- Press the Windows + R keys on your keyboard. This is going to bring up the Run utility.
- Type in “regedit” without the quotation marks and press the OK button. Doing so will launch the Registry Editor in a new window.
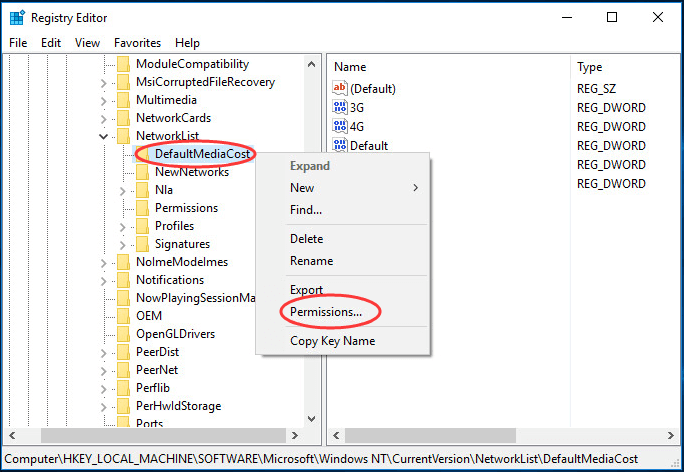
- Navigate to the following key: HKEY_LOCAL_MACHINE → SOFTWARE → Microsoft → Windows NT → CurrentVersion → NetworkList → DefaultMediaCost
- Right-click on the DefaultMediaCost folder and select Permissions…

- Click on the Add… button. Type your username into the Enter the object names to select field and click Check Names.
Read More: How to Connect AirPods to MAC?
Final Thoughts
We hope this article helped you figure out “what is Windows modules installer worker?” and fix the problem of Windows Modules Installer Worker using a lot of CPU on Windows 10. Don’t be afraid to come back to our website and help center if you have similar problems in the future. You’ll find a way out.


