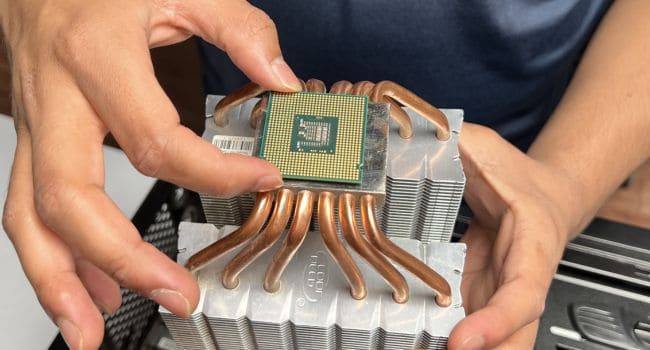
It’s possible for the cooler to become bonded to the integrated head spreader (IHS) if your computer hasn’t been used for a long. This typically occurs if you utilized a low-quality thermal paste or applied it improperly in the first place.
It is best to loosen the thermal paste bond and carefully pull the cooler away from the CPU.
Generally, a basic twist-and-pull technique should be effective. Here are some potential fixes in case it didn’t work or you pushed the cooler too hard and the CPU actually came out.
Important: Ground yourself before touching hardware components to discharge the static charge that has accumulated on your body.
Twist and Pull Method
Let’s begin with the simplest approach. This is for users who don’t frequently fiddle with their hardware parts. You can move on to the following strategy if you’ve already tried this.
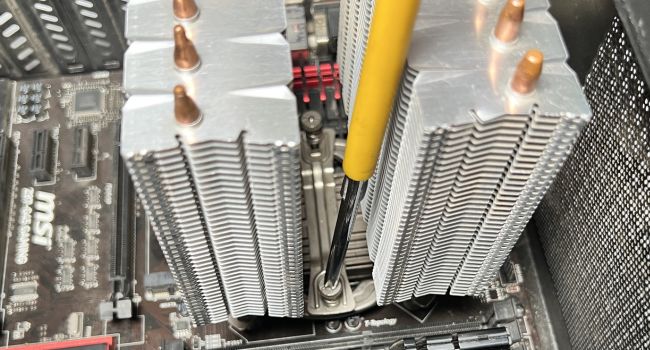
- Start by untightening the spring screws (generally in stock coolers) or unlocking the cam levers from the retention frames (usually in HSF/CPU coolers).

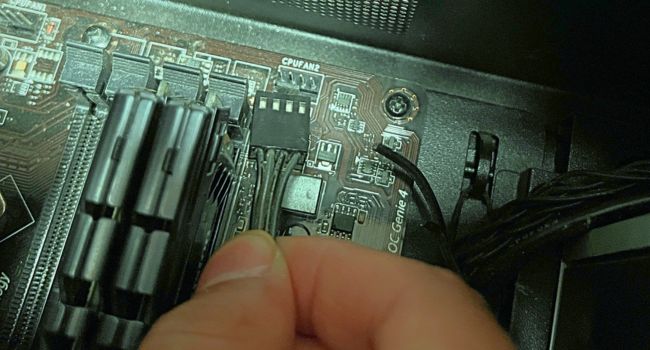
- Also, unplug the CPU FAN cable from the respective header.

- If you’re using an RGB cooler, make sure you ve removed the dedicated RGB cable as well.
- Next, hold the coolers firmly and twist the cooler gently in both clockwise and anti-clockwise directions. You should feel that the bond between the CPU IHS and the cooler (created by the thermal paste) is slowly breaking.
- While you’re twisting and turning, pull the cooler upwards applying very little pressure. Otherwise, you might end up pulling the CPU along with the cooler.
You need not be concerned if you pulled the CPU out of its slot unless the pins are bent. This is a typical issue with older Intel processors that don’t use the LGA architecture as well as AMD Ryzen (unless you’re using the newest 7000 series, which doesn’t have golden pins).
While you can straighten the pins by using our other guide, I would prefer that you seek out a professional. This is a challenging task, and if done incorrectly, you risk damaging the chip.
However, if all of the pins are functioning properly or your CPU uses flat gold contacts instead, follow these steps:
- Hold the processor firmly (avoid touching the pins/contacts with your fingers) and wiggle it a bit.
- Once you’re able to feel that the thermal paste bond is breaking, try pulling it out gently.

If you’re successful in removing the stuck CPU from the cooler, clean the paste using Isopropyl Alcohol dipped in a lint-free cloth from both surfaces.
Note: If you decide to reinstall it, be careful to first properly reinstall the CPU, tighten any retainer frames with screws, and apply a high-quality thermal paste to the IHS.
Read More: Canon Printer Printing Blank Pages? Use These 7 Time-Tested Solutions!
Running a Stress Test to Increase CPU Temperature
The CPU can sometimes become bonded to the cooler because the thermal paste bond doesn’t always break easily. You can twist and drag the cooler off the motherboard all you want, but it just won’t budge.
The best course of action in this situation is to do a stress test to raise the CPU temperature. The thermal paste begins to function to transport the heat to the cooler once sufficient heat has been produced. The paste will become softer as a result, and now you may carefully take the cooler away from the CPU.
- First of all, tighten the spring screws or lock the cam levers based on the type of cooler you have.
- Also, connect all the cables (CPU Fan, RGB, and others) you disconnected earlier.
- Start your PC and perform a stress test using a preferable tool. Else, you may run a high-intensive application (playing a game would be the best option) for about half an hour. This should be enough to soften the thermal paste.
- Now, shut down your computer.
- Next, discharge the capacitors by pressing the power button for about 10 seconds.
- Then. open the PC casing (in case you closed it earlier), disconnect the cables, and untighten the spring screws or unlock the cam levers.
- Finally, try the twist-and-pull method. This time, the cooler should come off without the CPU stuck on it.
Pull Using a Flat Headed Tool
The cooler with the jammed CPU comes out if you pull it too hard. Inserting a flat-headed tool and gently moving the CPU upwards should work in these circumstances.
- Take any flat-headed tool of your choice. A plastic spudger would be the best option. I do not recommend using a metal tool or very-sharp objects that may cause scratches to the IHS.
- Navigate to any corner of the CPU and insert the tool underneath it.
- Now, gently apply pressure upwards and the CPU should pop right out. Avoid applying too much force as this can cause the chip to fly high and hit the surface, bending/damaging the pins.
- You may now clean the thermal paste from both the CPU and cooler.
Read More: Canon Printer Printing Blank Pages? Use These 7 Time-Tested Solutions!
Thread/String Method
A flat-headed tool can be a bit dangerous, as was already described. Therefore, using a thread or string would be the ideal choice. Most people who encountered this issue utilized conventional dental floss or fishing line, and the solution has shown to be fairly effective.
- Take the string/thread to the corner and insert it beneath the chip.
- Just like you flush your teeth, start taking the string back and forth to remove the bond.
- The processor should get removed as soon as you reach somewhere in the middle. In case it is completely stuck, you might require taking the string from one corner to the other.
Apply External Heat
The aforementioned fixes ought to be sufficient to free the CPU from the cooler. However, if you were unable to complete it, the processor was likely improperly heated when a stress test was being done. In this situation, a hair drier or heat gun can be used to heat the heatsink. The appropriate method is as follows:
- Before anything else, make sure you remove the cooler fans first.
- Now, apply heat to the heatsink (not directly to the CPU) using a heat gun or hair dryer.
- After the heatsink is properly heated, the thermal paste bond should start breaking. Once you feel that it has moderately heated (usually two to three minutes is enough), start twisting the socket in both directions to remove it.
- In case that does t help, you may opt for the flat-headed tool or thread/string method as discussed above.


