To precisely replicate the colors, printers employ CMYK (Cyan, Magenta, Yellow, and Black) color models. You might have trouble getting accurate colors on the output if the printer is low on any of these inks.
The most likely explanation for your printer producing pink is that Cyan or Yellow ink has run out and Magenta (a pinkish-purplish-red tint) is taking over. As a result, to fix the problem, you need to check the ink level and replenish the ink.
Even though there is sufficient ink, the printer may still produce pink if there are other problems, such as a broken cartridge, a jammed printhead, or an incorrect color setting.
Use Compatible Papers
Not all papers available on the market work with your printer. The paper may not properly absorb the ink if you are using the wrong kind of paper with the printer.
Therefore, make sure you only print on papers that work with your printer. Change the paper type in the printing choices after that.
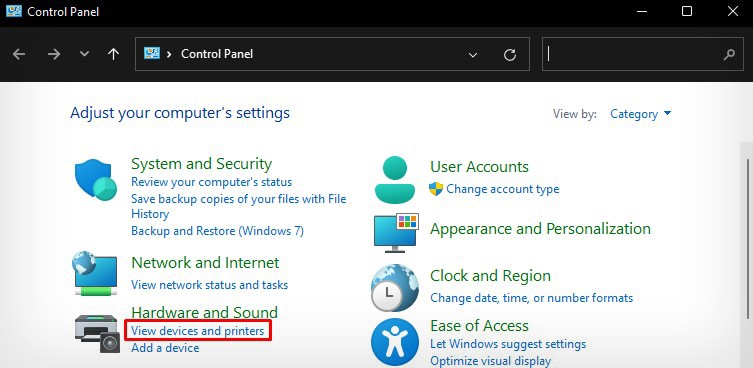
- Open Control Panel and click the highlighted option.
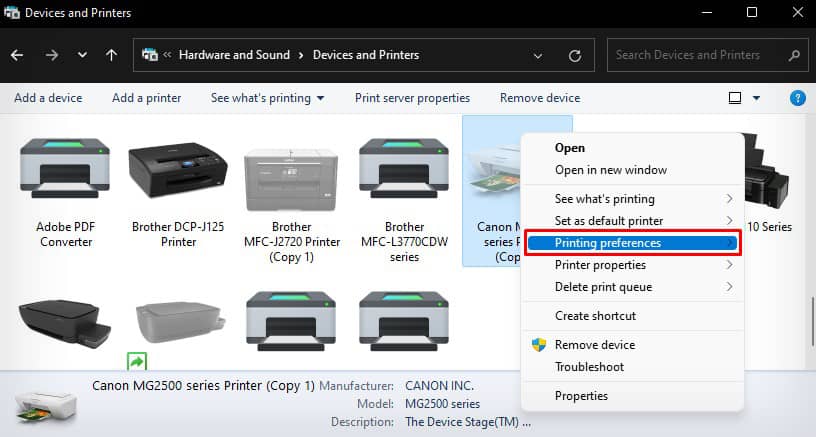
- Right-click the printer > Printing preferences.
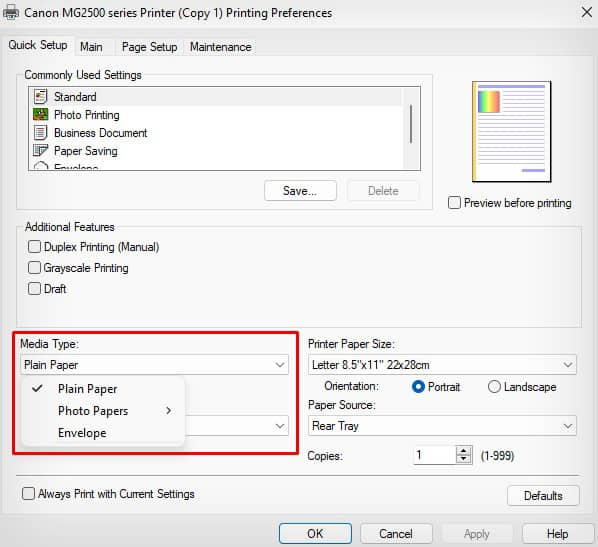
- Choose the paper type inserted in the printer from the Media Type or Paper Type drop-down.
- Click OK.
Change the Color Settings
Users of printers frequently ignore their printer’s color settings, yet most of the time, this is what causes the printer to print pink. If the color settings are set to print more pink than other colors, you might be dealing with the issue.
You can check to see if the issue is resolved by returning the color settings to their default settings. I’ll be showing you these procedures for Canon printers. Similar procedures apply to other printers as well.
- Open your printer s Printing preferences.

2. Go to Main > Color/Intensity > Set.
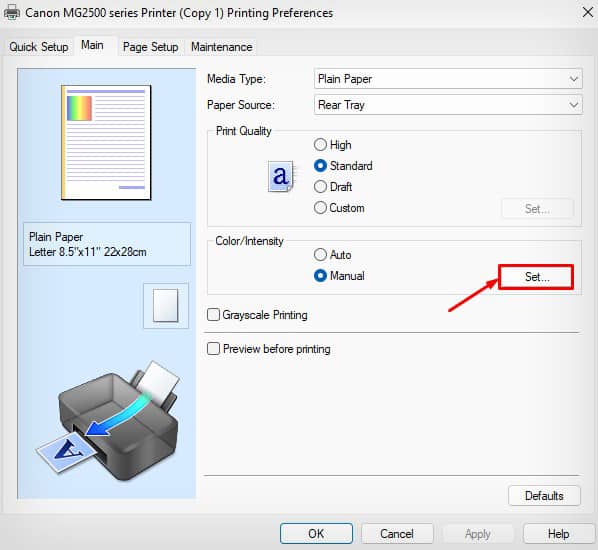
3. In my case, the Cyan and Yellow intensity were set too low but Magenta levels were too high. It was causing my printer to print pink.
4. To solve this, click Defaults > OK.
Isolate the Color Cartridges
Additionally, you can print without any problems while your printer’s color cartridges are temporarily disabled. If you exclusively print black-and-white papers, you won’t run across any issues with this method.
I’ll show you how to use Canon printers to do it.
- Launch Printing preferences.
- Go to Maintenance > Ink Cartridge Settings.
- Click the drop-down and select Black Only.
- Tap OK.
You can choose grayscale printing mode and print your papers instead since this capability is not accessible on all printer models.
- Launch Printing preferences.
- Find the color settings panel and choose Grayscale from there.
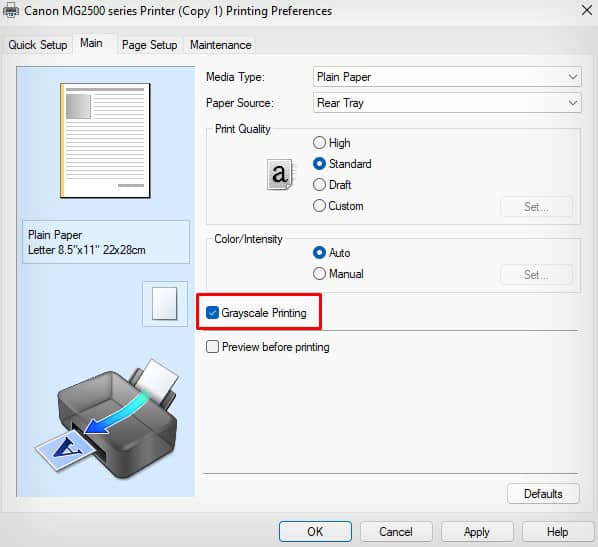
However, move on to the additional improvements covered below if you must print color documents.
Read More: Canon Printer Printing Blank Pages? Use These 7 Time-Tested Solutions!
Check Ink Levels
Always check that the printer has enough ink to produce the colors accurately. Because interrupting the color conversion process and creating the problem can be done when Cyan, Magenta, Yellow, or Black ink levels are low.
For instance, if you are printing in pink rather than red, your printer may not have enough yellow ink.
To learn the color scheme, please see the image below. Once you know which ink has to be refilled or which cartridge needs to be changed, you can proceed.
Similarly to that, you can use the printer helper function to check the ink levels on your printer. Check the levels and replenish the ink as needed.
I’ll demonstrate how to examine the ink levels in a Canon printer.
- Open your Canon printer s Printing preferences.
- Click Maintenance > View Printer Status.
- See the ink levels.
For additional information on how to check the ink levels in all printers, go to this complete guide.
Read More: Alphabet and Meta Draw Back Advertisers as Smaller Rivals Struggle
Check the Nozzles and Clean the Printhead
Tiny nozzles in printheads spray the ink onto the papers. However, when they are clogged, the colors cannot be properly incorporated into the papers. The printer is producing pink in our instance. It suggests that the nozzles used to spray colors other than magenta may have been clogged.
To determine which nozzle is clogged, you can first print a nozzle check pattern. then proceed to behave accordingly.
- Open Printing preferences.
- Click Maintenance > Nozzle Check.
- Click this button.
- Click OK.
- The printout should look like this. If any color is missing or faded, you can confirm that the corresponding nozzle is clogged.
- You need to clean the printhead to sort out this. Go back to the Maintenance tab and run these two cycles.
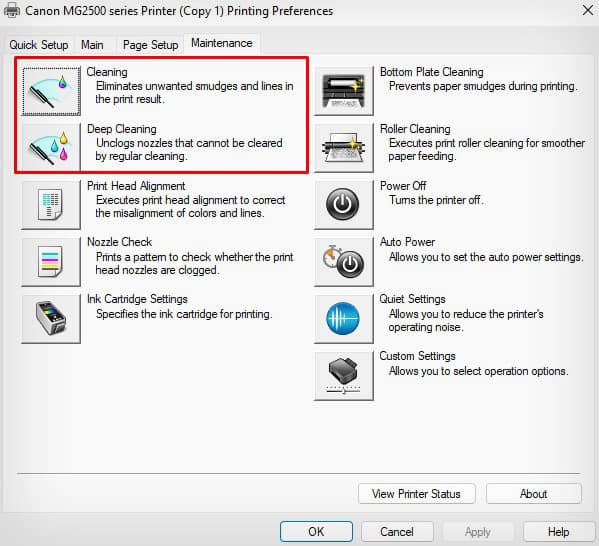
I advise physically cleaning the printheads if it doesn’t work. The printhead should be taken out of the printer and cleaned using a lint-free cloth dipped in distilled water. After cleaning, put it back into the printer to see whether the problem still exists.
For further information on how to manually clean printheads, you can also refer to this manual.
Service the Printer
If you’re still having trouble printing normally, your printer might need to be serviced. There is a possibility that the printhead gets harmed.
Issues arise because a damaged printhead cannot apply the proper amount of ink to the paper. Installing a replacement printhead on your printer might be necessary.
Similar to the cyan cartridge, the magenta one could malfunction and bleed ink unnecessarily. If that’s the case, you can check by taking out the cartridge. Consider purchasing a fresh set of cartridges to see if doing so solves the issue.
Take your printer to a certified service facility for repair if nothing else works.


